5 Steps for Building and Deploying Deep Learning Neural Networks
Use Deep Learning to Simplify and Accelerate Machine Vision Implementation.

Introduction
The saying “a picture is worth a thousand words” never rang so true in the world of machine vision as it does today. With deep learning, thousands, even millions of lines of code can be replaced by a simple neural network trained with images and very little coding.
The great news is that deep learning is no longer a method available only to researchers or people with highly specialized skills and/or big budgets. Today, many tools are free, tutorials are easy to find, hardware cost is low and even training data is available at no cost. This presents both opportunities and threats - as new players emerge to disrupt established names and spur innovation. It also provides opportunities for your machine vision systems to do things previously unimaginable – as an example, deep learning can be used to recognize unexpected anomalies, typically very difficult or almost impossible to achieve with traditional coding.
A noteworthy benefit of deploying deep learning neural networks is that it allows complex decisions to be performed on the edge with minimal hardware and very little processing power - Low cost ARM or FPGA based systems and new inference cameras like the FLIR Firefly DL make this possible.
In this article, you will learn:
- Basic glossary used in deep learning
- Types of machine vision tasks deep learning is most suitable for
- The 5 steps for developing and deploying a neural network for inference on the edge
- Available tools and frameworks to get started
- Tips on making the process easier
- Potential shortcomings of deep learning to consider
What is Deep Learning: The Fundamentals
Deep learning is a subset of machine learning inspired by how the human brain works. The thing that makes deep learning “deep” is the fact that there are multiple “layers” of neurons of various weights which help a neural network make its decision. Deep learning can be broken into two stages, training and inference.
During the training phase, you define the number of neurons and layers your neural network will be comprised of and expose it to labeled training data. With this data, the neural network learns on its own what is ‘good’ or ‘bad’. For example, if you are grading fruits, you would show the neural network images of fruits labeled “Grade A”, “Grade B”, “Grade C”, and so on. The neural network then figures out properties of each grade; such as size, shape, color, consistency of color and so on. You don’t need to manually define these characteristics or even program what is too big or too small, the neural network trains itself. Once the training stage is over, the outcome is a trained neural network.
The process of evaluating new images using a neural network to make decisions on is called inference. When you present the trained neural network with a new image, it will provide an inference (i.e. an answer): such as “Grade A with 95% confidence.”
5 Steps for Developing a Deep Learning Application
The development of a deep learning application broadly entails 5 steps. A high-level description of each step follows:
Step 1] Identify the appropriate deep learning function
In the world of deep learning, tasks are classified into several functions. The ones we consider most common to machine vision are:
Classification
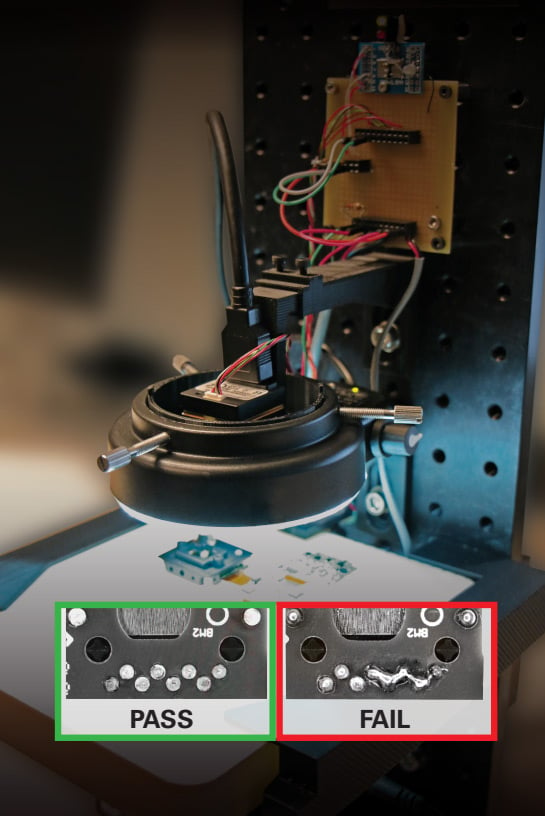
First and most basic application of deep learning is classification. The process involves sorting images into different classes and grouping images based on common properties. As an example, you can use classification to separate a flawed part from a good one on a production line for quality control or while conducting PCB solder inspections – like illustrated in Fig.1 below (using a FLIR Firefly DL inference camera).

Fig.1. Classification used to identify flawed solders using a FLIR Firefly DL.
Detection and Localization
Another deep learning task ideal for machine vision is called detection and localization. Using this function, you can identify features in an image and provide bounding box coordinates to determine its position and size. For example, it can be utilized to detect a person breaching a safety parameter around robots on a production line or identify a single bad part on a production/assembly line conveyor system.
Segmentation
The third type of deep learning is segmentation; typically used to identify which pixels in an image belong to which corresponding objects. Segmentation is ideal for applications where determining the context of an object and it’s relationship to each other are required (for example autonomous vehicle / Advanced Driver Assistance Systems, popularly referred to as ADAS).

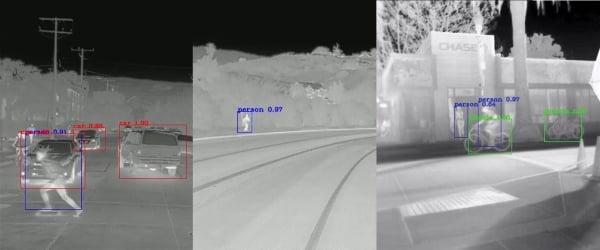
Fig.2 Detection, localization and segmentation used to identify objects and their locations.
Anomaly detection
This type of deep learning task can be utilized to identify regions that do not match a pattern. A typical example of an application where anomaly detection can add value would be stock control and inventory management at grocery stores. This application involves using an inference camera to detect and highlight shelves that are empty or about to need replenishment, providing real-time notifications and improving efficiency.
Step 2] Select your framework
Once you determine the deep learning function you intend to use, you’ll need a toolset (developers call this a “framework”) best suited to your needs. These frameworks will provide a choice of starter neural networks and tools for training and testing the network.
With some of the world’s biggest technology companies vying for dominant positions in the deep learning market, frameworks like TensorFlow by Google, Caffe2 by Facebook and OpenVino by Intel (all free) demonstrate the quantum of investments and resources flowing into the deep learning market. On the other end of that spectrum, you also have Pytorch, an open source solution thats now part of Facebook. These tools are easy to use and provide great documentation (including examples), so even a novice user can train and deploy a neural network with minimum effort.
Discussing all available frameworks would warrant a separate article, but the following pointers list key advantages and disadvantages for 3 of the most popular frameworks:
Pytorch
- Simple and easy to use.
- Used in many research projects.
- Not commonly used for large deployment.
- Only fully supported for Python.
TensorFlow
- Large user base with good documentation.
- Higher learning curve compared to Pytorch.
- Offers scalable production deployment and supports mobile deployment.
Caffe2
- Lightweight, translating to efficient deployment.
- One of the oldest frameworks (widely supported libraries for CNNs and computer vision).
- Best suited for mobile devices using OpenCV.
The neural network you choose would eventually depend on the complexity of the task at hand and how fast your inference needs to run. E.g. one can choose a neural network with more layers and more neurons, but the inference would run slower. Typically, a trained neural network requires very little computing power and can deliver results in a matter of milliseconds. This allows complex deep learning inferences to be performed on the edge with low power ARM boards or inference on the edge - with specially manufactured inference cameras like the FLIR Firefly DL.
Furthermore, even companies lacking the resources and employees to learn and implement a deep learning solution can rely on third party consultants; who can help various stakeholders through the entire development cycle – from conceptualization to deployment. One such example is Enigma Pattern (https://www.enigmapattern.com).
Sign Up for More Articles Like This
Step 3] Preparing training data for the neural network
Depending on the type of data you want to evaluate, you’ll require a repository of images with as many characteristics you hope to utilize in your evaluation and they need to be labelled appropriately As an example, if your neural network needs to identify a good solder from a bad one, it would need hundreds of variations of what a good solder looks like and a similar set of what bad solders look like with labels that identify them as such.
There are several avenues to obtain a dataset of images:
- For use cases that are common, you might find a pre-labelled dataset that matches your specific requirements available for purchase online (in many cases, even free).
- Generating synthetic data may be an efficient option for several applications; especially since labelling is not required. Companies like Cvedia; backed by FLIR (https://www.cvedia.com) employ simulation technology and advanced computer vision theory to build high-fidelity synthetic training set packages. These datasets are annotated and optimized for algorithm training.
- If the first two options are not available, you would need to take your own images and label them individually. This process is made easy by several tools available on the market (a few tools and techniques to shorten the development timeline are briefly discussed below).
Helpful Tips:
In the process of building their own deep learning code, several developers open source their solution and are happy to share them for free. One such tool particularly useful if your dataset is not pre-labelled, is called LabelImg; a graphical image annotation tool that helps label objects into bounding boxes within images (https://github.com/tzutalin/labelImg). Alternatively, the entire process can be outsourced to a third party.
Another way to shorten the data preparation stage entails augmenting one image into many different images, by performing image processing on them (rotate, resize, stretch, brighten/darken… etc.). This would also free up development time, as the process of capturing training data and labeling the images can be offloaded to a novice user.
Furthermore, if you have specific hardware limitations or preferences, this becomes even more important, because deep learning tools discussed in the next section support a finite set of hardware and are often not interchangeable.
Step 4] Train and validate the neural network to ensure accuracy
After the data is prepared, you will need to train, test, and validate the accuracy of your neural network. This stage involves configuring and running the scripts on your computer until the training process delivers acceptable levels of accuracy for your specific use case. It is a recommended best-practice to keep training and test data separate to ensure the test data you evaluate with is not used during training.
This process can be accelerated by taking advantage of transfer learning: the process involves utilizing a pre-trained network and repurposing it for another task. Since many layers in a deep neural network are performing feature extraction, these layers do not need to be retrained to classify new objects. As such, you can apply transfer learning techniques to pre-trained networks as a starting point and only retrain a few layers rather than training the entire network. Popular frameworks like Caffe2 and TensorFlow provide these for free.
Furthermore, adding new features to detect to an already trained neural network is as easy as adding additional images to the defective image set and applying transfer learning to retrain the network. This is significantly easier and faster than logic-based programing; where you must add the new logic to the code, recompile and execute while ensuring the newly added code does not introduce unwarranted errors.
If you lack coding expertise to train your own neural network, there are several GUI (Graphical User Interface) based software that work with different frameworks. These tools make the training and deployment process very intuitive, even for less experienced users. Matrox MIL is one such example from the machine vision world.
Step 5] Deploy the neural network and run inference on new data
The last step entails deployment of your trained neural network on the selected hardware to test performance and collect data in the field. The first few phases of inference should ideally be used in the field to collect additional test data, that can be used as training data for future iterations.
The following section provides a brief summary of typical methods for deployment with some associated advantages and disadvantages:
Cloud deployment
- Significant savings on hardware cost
- Ability to scale up quickly
- Ability to deploy and propagate changes in several locations
- Need for an internet connection is a key disadvantage
- Higher latency compared to edge deployment (due to volume of data transfers between the local hardware and cloud)
- Lower reliability (connection issues can cause critical failures)
Edge (Standard PC)
- Ideal for high performance applications
- Highly customizable (build with parts that are relevant to the application)
- Flexible pricing (as components can be selected based on application)
- Higher cost
- Typically, significantly larger footprint
Edge (ARM, FPGA & Inference Cameras like FLIR Firefly DL)
- Low power consumption
- Significant savings in peripheral hardware
- High reliability
- Ideal for applications that require multiple cameras in one system (helping to offload the processing requirement to several cameras).
- Secure (as hardware can be isolated from other interferences)
- Ideal for applications that require compact size
- Not suitable for computationally demanding tasks
- VPU based solution has higher performance/power ratio compared to FPGA solutions
- FPGA solution has better performance compared to VPU based solution
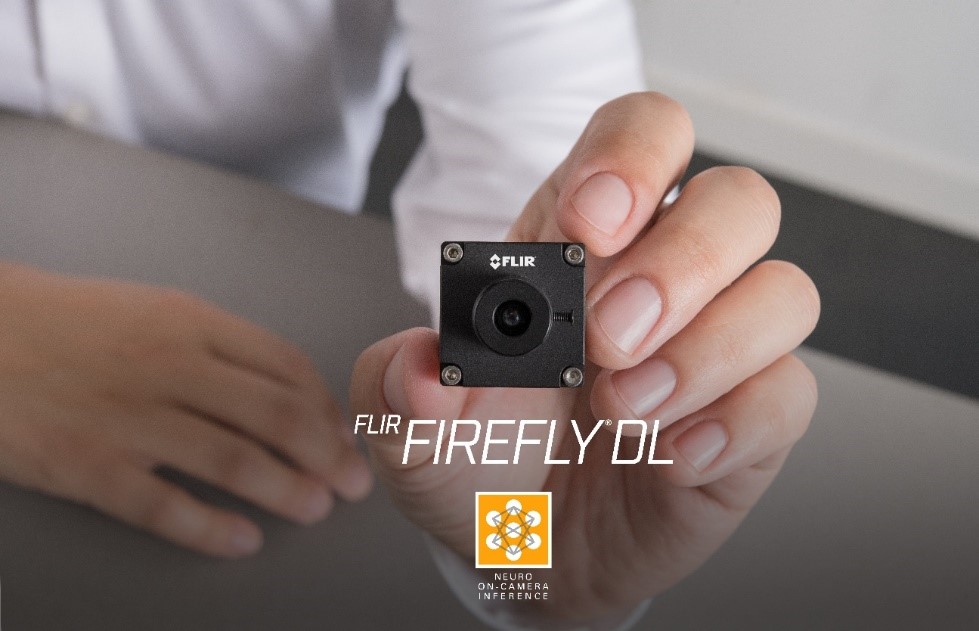
Image: An example of a DL inference camera – FLIR Firefly DL
Potential shortcomings of deep learning
Now that we’ve covered an overview of the development and deployment process, it would be pertinent to look at some shortcomings too.
- Deep learning is a black box for the most part and it’s very difficult to really illustrate / figure out how the neural network arrives at its decision. This may be inconsequential for some applications, but companies in the medical, health and life sciences field have strict documentation requirements for the products to be approved by the FDA or its counterparts in other regions. In most cases you need to be fully aware of how your software functions and are required to document the entire operation in fine detail.
- Another issue to contend with while deploying deep learning is that it’s very hard to optimize your neural network in a predictable manner. Many neural networks that are currently being trained and used, take advantage of transfer learning to retrain existing networks while very little optimization occurs.
- Even minor errors in labelling training data, which can occur rather frequently due to human error, can throw off the accuracy of the neural network. Furthermore, it is extremely tedious to debug the problem as you may have to review all your training data individually to find the incorrect label.
In addition to these shortcomings, many applications are conceptually better suited for logic-based solution. For instance, if your problem is well defined, deterministic and predictable, using logic-based solutions may provide better results as compared to deep learning. Typical examples include barcode reading, part alignment, precise measurements and so on.
Conclusion
Even with some of the shortcomings highlighted above, the potential benefits accrued from deep learning far outweigh the negatives (rapid development, ability to solve complex problems, ease of use and deployment - just to name a few). Furthermore, there are constant improvements being made in the field of deep learning that overcome these shortcomings. For instance, activation maps can be used to visually check what pixels in the image are being considered when a neural network is making its decision, so that we can better understand how the network arrived at its conclusion. Also, with wider adoption many companies are now developing their own neural networks instead of relying on transfer learning – improving performance and customizing the solution for specific problems. Even in applications that are suited for logic-based programming, deep learning can assist the underlying logic to increase overall accuracy of the system. As a parting note, it’s getting easier and cheaper than ever before to get started on developing your own deep learning system: click here to learn how to build a DL classification system for less than $600.
See More Machine Vision
We are here to help!
Contact a camera specialist today.
