Multi-Camera Imaging Guide
By Dr. Matthew Kose-Dunn
Introduction
Imaging with multiple cameras simultaneously is a powerful tool for microscopy, enabling researchers to capture multiple wavelengths, focal planes, polarizations and more simultaneously while retaining the full field of view (FOV) of the camera.
This article covers the hardware and software setup for multi-camera imaging with Teledyne Photometrics scientific CMOS cameras, with a particular focus on the Kinetix Family. If you have any questions that are not covered by this article, please reach out to us.
The main topics covered in this article are: the need for a high-performance computer to pair with your imaging system, the importance of having sufficient PCIe lanes and CPU processing power, how to run multiple Kinetix Family cameras from a single PCIe card, DIP switch configuration, running multiple Kinetix Family cameras from multiple PCIe cards, streaming with multiple cameras and the need for a SSD RAID0 array, and how to image from multiple cameras in MicroManager imaging software.
Hardware Setup: Kinetix Family
The groundbreaking Kinetix Family represents the next generation of sCMOS cameras, with larger sensors, lower noise levels, higher acquisition speeds and more powerful on-board processors. At the time of writing, there are currently two members in the Kinetix Family, the Kinetix and the Kinetix22, as seen in Table 1.
Table 1: Comparing specifications of the Kinetix and Kinetix22 CMOS cameras. QE: quantum efficiency, e-: electrons, MP: megapixels, fps: frames per second
|
Camera Model |
QE |
Read Noise |
Pixel Size |
Pixel Array Size |
Sensor Size |
Speed |
|
Kinetix |
95% |
0.7 e- |
6.5 µm |
3200 x 3200 (10 MP) |
29.4 mm |
498 fps |
|
Kinetix22 |
95% |
0.7 e- |
6.5 µm |
2400 x 2400 (5.76 MP) |
22 mm |
664 fps |
Kinetix cameras feature large sensors and high maximum framerates, this results in very high‑throughput imaging. Users can select one of four imaging modes when using a Kinetix or Kinetix22, as seen in Table 2.
Table 2: The four imaging modes of the Kinetix and Kinetix22. Speed is stated for Kinetix/Kinetix22
|
Imaging Mode |
Bit Depth |
Speed |
Read Noise |
Features |
|
Speed |
8-bit |
498/664 fps |
2.0 e- |
Enables cameras to image at max speed |
|
Sensitivity |
12-bit |
88/118 fps |
1.2 e- |
Balance of speed and sensitivity |
|
Dynamic Range |
16-bit |
83/111 fps |
1.6 e- |
Large full well capacity for intense signals |
|
Sub-Electron |
16-bit |
5/6.9 fps |
0.7 e- |
Minimizes read noise for ultimate sensitivity |
In the 8-bit Speed mode each Kinetix/Kinetix22 image at full frame will be 10/5.76 megabytes (MB), and in all other modes each image at full frame has double the file size at 20/11.52 MB. However, while images taken in Speed mode have a smaller file size, so many images can be acquired each second that Speed mode has the largest data rate.
The main bottleneck for imaging with multiple Kinetix cameras is the high data rate when imaging at full speed across the full frame. Here are the maximum data rates for each camera:
- Kinetix: 10 MB images at 498 fps = 4980 MB/s or ~5 GB/s
- Kinetix22: 76 MB images at 664 fps = 3825 MB/s or ~3.8 GB/s
These data rates are in GB/s or gigabytes per second (not Gb or gigabit), and are greater than typical scientific cameras. For this reason, we supply external PCIe digital interface cables with Kinetix Family cameras, as these have a much greater data transfer rate than USB.
Kinetix Family cameras come with a PCIe card and PCIe cables in the box, when the card is plugged into the PC motherboard and the cables are plugged into the card and camera, Kinetix Family cameras can acquire at full speed and even stream to disk.
The PCIe card we supply is the Dolphin PXH832, which is a PCIe 3.0 card capable of up to 16 GB/s data transfer once certain conditions are met, namely:
- The card must be inserted into a x16 PCIe lane on the PC motherboard
- The PC motherboard must support PCIe 3.0 speeds (a standard introduced in 2010) or above
- The PC must be running Windows 10 64-bit or above
- The PCIe cables used to connect the card and Kinetix Family camera must be PCIe 3.0 or above, we highly recommend using our supplied PCIe cables as these meet the specification
Once these conditions are met, you are ready to run one or more Kinetix Family cameras from the PCIe card. Due to the high data throughput possible with a x16 PCIe 3.0 port, multiple Kinetix Family cameras can be run from a single card, as outlined in the next section.
Kinetix Family cameras are also shipped with USB 10 Gbps (previously known as USB 3.2 Gen2) cables, as well as a card in case your PC is lacking modern USB ports. However, as the data rate on these cables is only 1.25 GB/s, they are unable to run Kinetix Family cameras at their maximum speeds. If imaging at lower acquisition speeds or across small regions of interest, the USB cable may be suitable, but for all other applications we recommend our supplied PCIe option.
Multiple Kinetix Family Cameras on a Single PCIe Card
The Dolphin PXH832 PCIe card can support up to four Kinetix Family cameras (depending on camera imaging mode), resulting in an extremely powerful high‑throughput system. However, in order to best use multiple Kinetix Family cameras on a single PCIe card, we need to dive further into this card and its features, as seen in Fig.1.
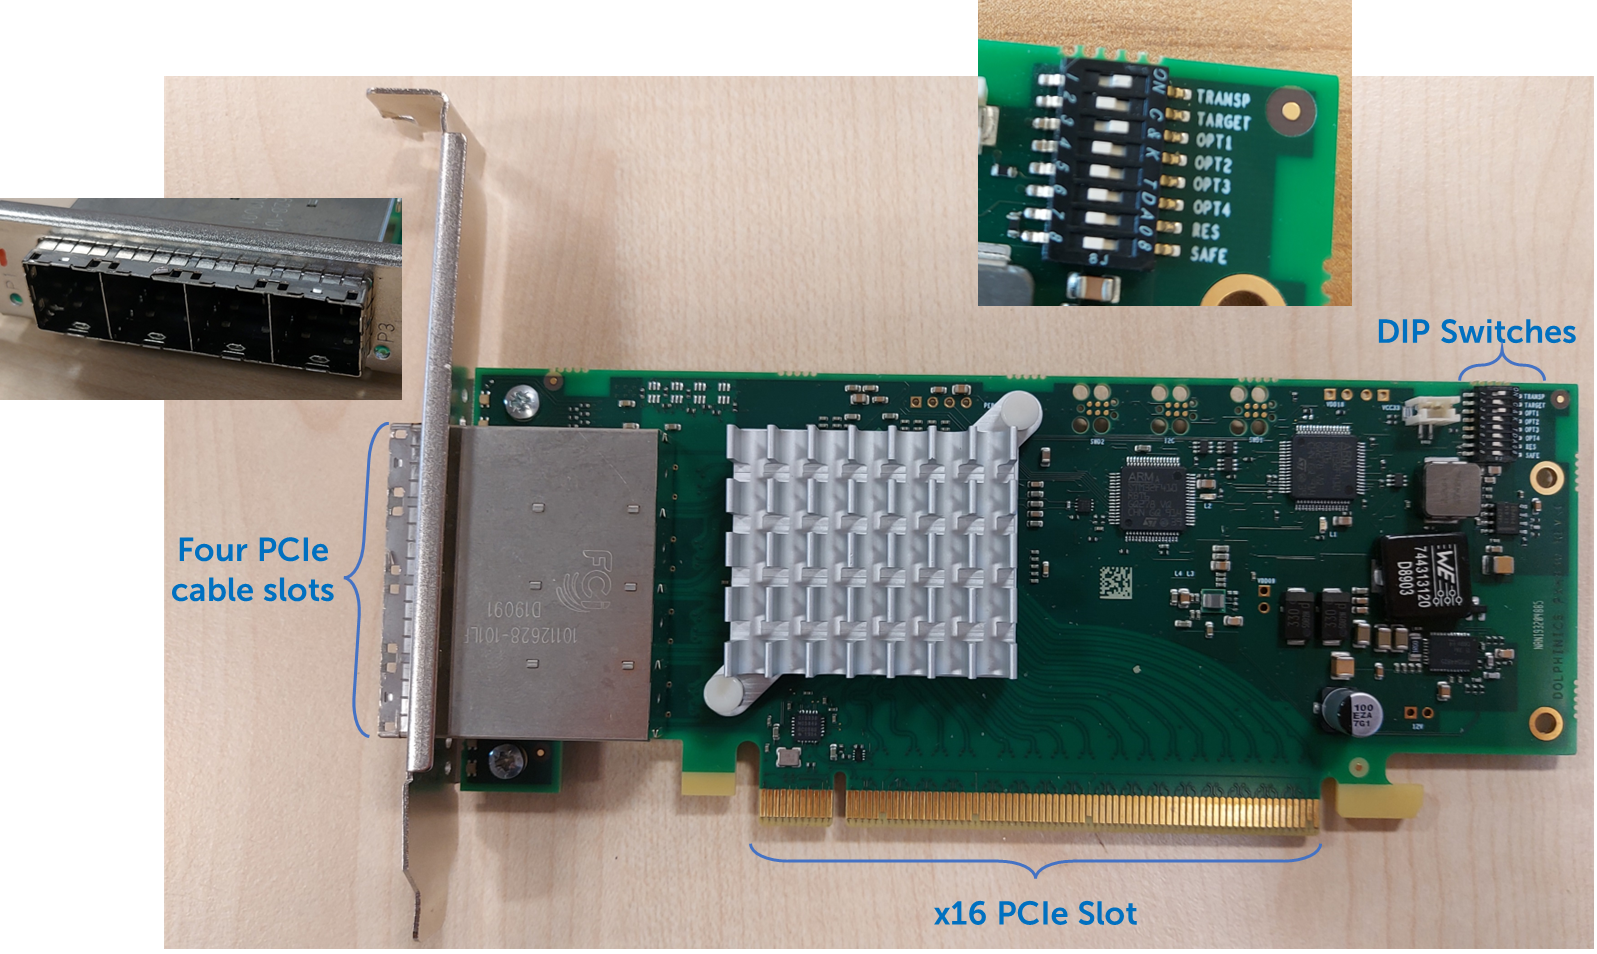
Figure 1: The Dolphin PXH832 PCIe card supplied with Kinetix Family cameras. Of particular interest are the four slots for attaching PCIe 3.0 cables (left and left insert), the x16 PCIe slot for attaching the card to PCIe lanes on your PC motherboard (bottom), and the DIP switches for configuring the functions of the card (right and top insert).
#1: Set the DIP Switches
Dual in-line package (DIP) switches are small manual switches that change how the PCIe card functions. When put into certain configurations they allow for the use of multiple cameras. This card contains a bank of eight switches, their names and functions detailed in Table 3.
Table 3: DIP switch settings for the Kinetix Family PCIe card (Dolphin PXH832). These cards typically leave the factory with default settings, namely with switches #1 and #3 on, as seen in Fig.2.
|
DIP # |
Name |
Description |
Default Setting |
|
1 |
TRANSP |
Configuration selector |
ON |
|
2 |
TARGET |
Toggles between Target and Host |
OFF |
|
3 |
OPT1 |
Configuration selector |
ON |
|
4 |
OPT2 |
Enables use of long cables (>4m) |
OFF |
|
5 |
OPT3 |
For future use |
OFF |
|
6 |
OPT4 |
Disables cable management interface (CMI). CMI enables PCIe Gen 3 cables to communicate with subsystems. |
OFF |
|
7 |
RES |
Enables reset of board management |
OFF |
|
8 |
SAFE |
Enables card to boot in safe mode if memory is corrupted. |
OFF |
While there are many combinations of settings available, for our purposes these DIP switches essentially allow users to split up the x16 lane into any of three different configurations, as seen in Fig.2:
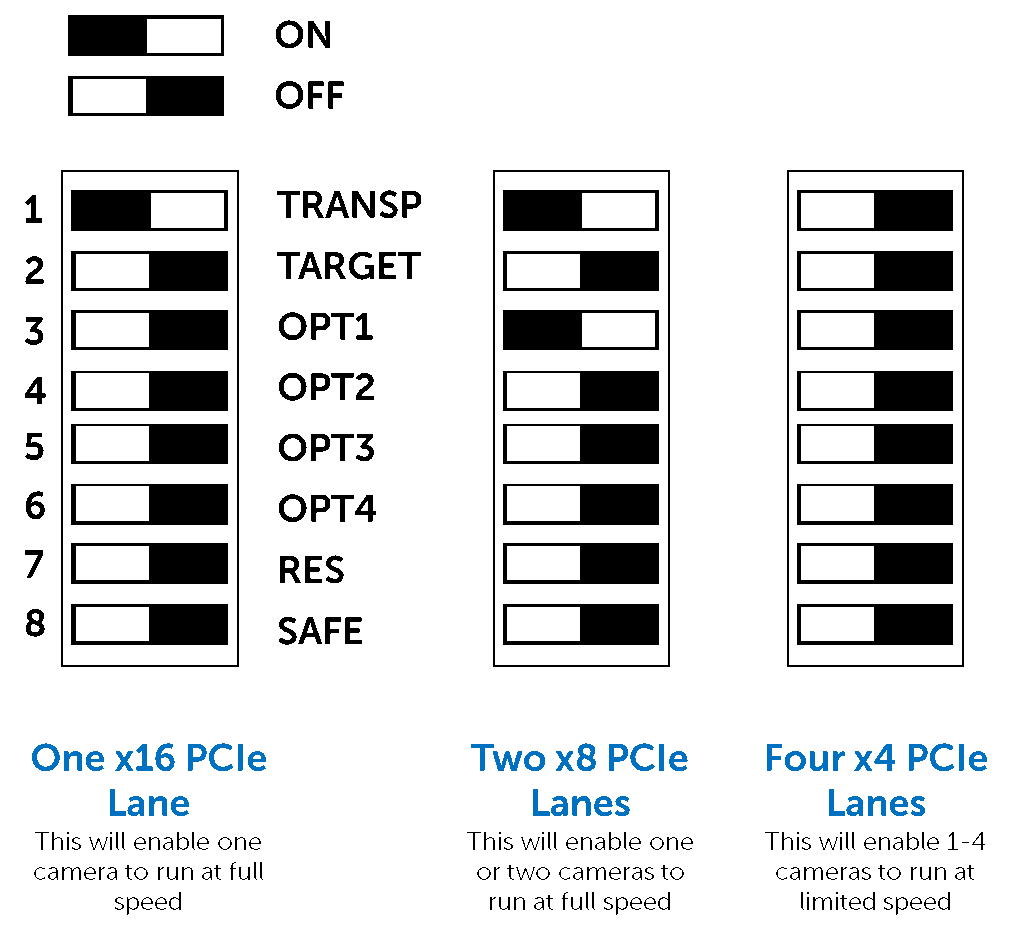
Figure 2: DIP Switch configurations on the PCIe card for Kinetix Family cameras.
As a Kinetix Family camera only needs a single x8 PCIe lane to run at maximum speed, the default setting (#1 and #3 on) splits the x16 lane into two x8 lanes, to allow for two cameras to run at maximum speed.
If using two Kinetix Family cameras, keep the DIP switches at default (#1 and #3 on, mid config in Fig.2).
If wanting to use more than two, turn all DIP switches off (right hand config in Fig.2).
#2: Install the PCIe Card
The x16 PCIe slot at the bottom of the card attaches the card to a PCIe lane on your PC motherboard, but should only be attached to a compatible motherboard, and only to a corresponding high speed PCIe 3.0 x16 lane. The card will not be able to run multiple Kinetix Family cameras if attached to a physically smaller x8, x4 or x1 lane.
#3: Attach the PCIe Cables
Each Kinetix Family camera comes with two PCIe 3.0 cables in the box, each is able to carry x4 lanes worth of data, or ~4 GB/s in data rate terms. This means that two cables are necessary to operate each Kinetix/Kinetix22 in 8-bit Speed mode, while the lower data rates of the 16-bit Dynamic Range, 12-bit Sensitivity and 16-bit Sub‑Electron modes can operate each camera with a single cable.
Each Kinetix Family camera has two PCIe ports on the back, as seen in Fig.3.
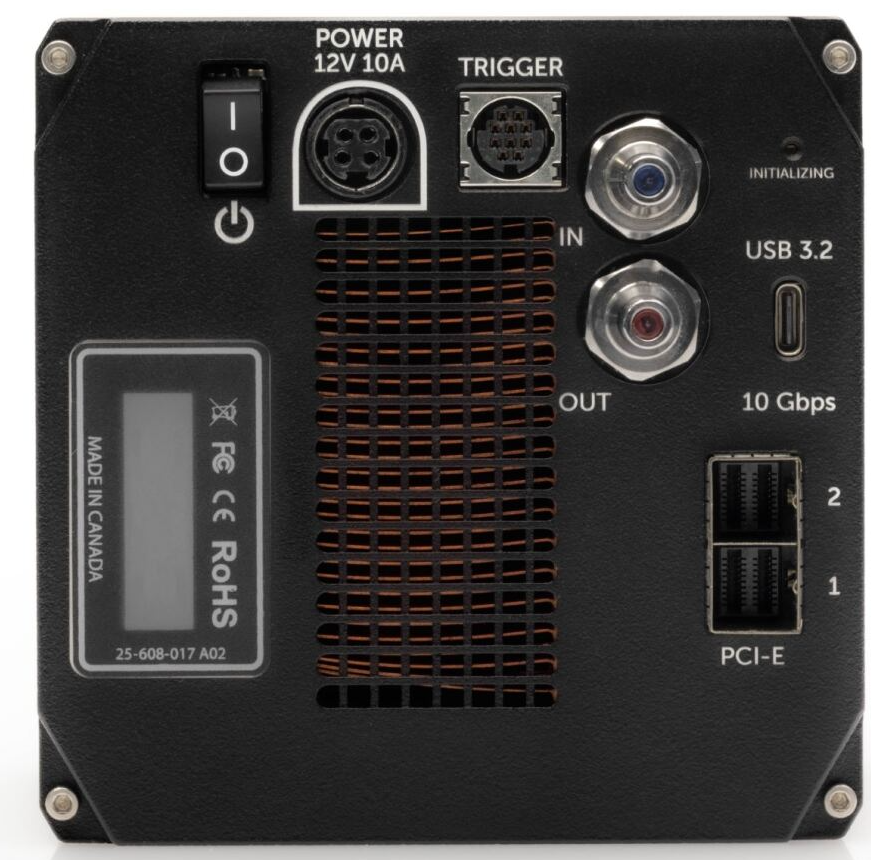
Figure 3: The rear panel of a Kinetix or Kinetix22 camera, showing the two numbered PCIe cable ports.
When attaching the supplied cables, it is important to connect them in the right orientation. The cable connected to port #1 on the Kinetix should connect to port #1 on the PCIe card, and so on. This becomes especially important when using multiple Kinetix Family cameras on a single card, as there will be up to four cables in a single card, all going to multiple cameras. Fig 4. shows two cables in a Kinetix and the PCIe card.
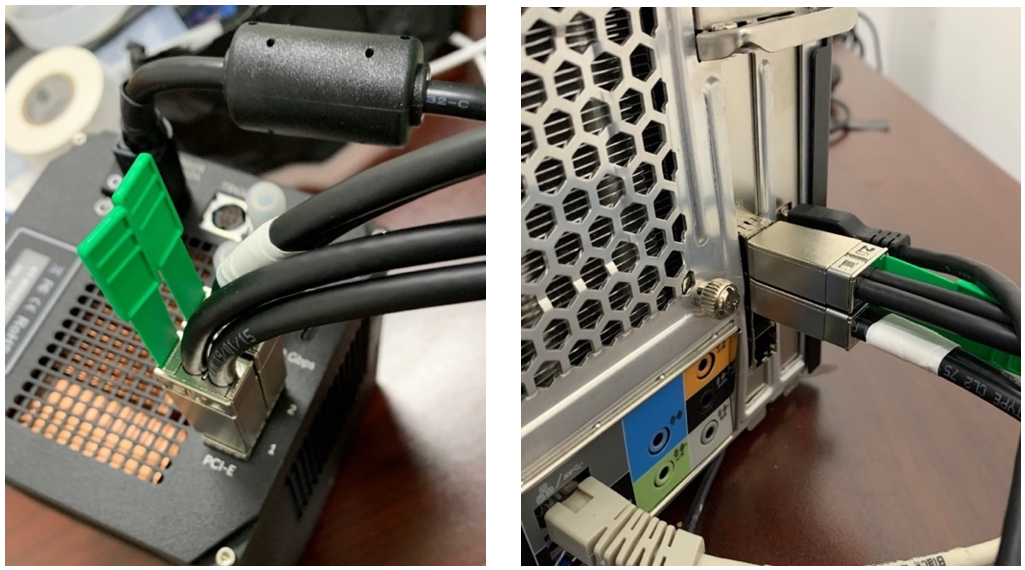
Figure 4: Two PCIe cables plugged successfully into a Kinetix (left) and the PCIe card in the PC (right)
#4: How many cameras?
Each PCIe card has four cable ports (see Fig.1), which means each card can run multiple Kinetix Family cameras, with the number of cameras usable with a single card depends on the mode the cameras are used in. Kinetix Family cameras feature Sensitivity, Speed, Sub-Electron or Dynamic Range modes, each of which can image at different maximum speeds, shown in Table 4:
Table 4: Speed and max data rate (in megabytes per second) of the Kinetix and Kinetix22 in each imaging mode.
|
Kinetix Imaging Modes |
||||||||||
|
Sensitivity |
Speed |
Dynamic Range |
Sub-Electron |
|||||||
|
Imaging speed |
88 fps |
498 fps |
83 fps |
5.2 fps |
||||||
|
Data rate |
1760 MB/s |
4980 MB/s |
1660 MB/s |
104 MB/s |
||||||
|
|
|
|||||||||
|
Kinetix22 Imaging Modes |
||||||||||
|
Sensitivity |
Speed |
Dynamic Range |
Sub-Electron |
|||||||
|
Imaging speed |
118 fps |
664 fps |
111 fps |
6.9 fps |
||||||
|
Data rate |
1360 MB/s |
3825 MB/s |
1280 MB/s |
80 MB/s |
||||||
This essentially means that a different number of Kinetix Family cameras can be run off a single card depending on what mode they are in, as modes other than Speed have lower data rates. This is summarized in Table 5.
Table 5: Number of Kinetix or Kinetix22 cameras and the associated data rates.
|
Kinetix |
Kinetix22 |
|
|||||
|
Mode |
Number of cameras |
Data rate (MB/s) |
Max speed per camera (fps) |
Data rate (MB/s) |
Max speed per camera (fps) |
||
|
Speed |
2 |
9960 |
498 |
7650 |
664 |
||
|
3 |
14940 |
<498 |
11475 |
<664 |
|||
|
4 |
19920 |
<498 |
15300 |
<664 |
|||
|
Sensitivity |
2 |
2637 |
88 |
1360 |
118 |
||
|
3 |
3955 |
88 |
2040 |
118 |
|||
|
4 |
5273 |
88 |
2720 |
118 |
|||
|
Dynamic Range |
2 |
3242 |
83 |
1278 |
111 |
||
|
3 |
4863 |
83 |
1917 |
111 |
|||
|
4 |
6484 |
83 |
2556 |
111 |
|||
|
Sub Electron |
2 |
213 |
5.2 |
80 |
6.9 |
||
|
3 |
319 |
5.2 |
120 |
6.9 |
|||
|
4 |
436 |
5.2 |
160 |
6.9 |
|||
In summary, when using Speed mode and wanting to image at full speed, a maximum of two Kinetix Family cameras can be run off a single PCIe card. The orange rows on Table 5 indicate that the data rate is too high for a single card and the camera speed will be impacted.
If wanting to use more than two Kinetix Family cameras in Speed mode at full speed, multiple PCIe cards will be required.
Multiple Kinetix Family Cameras on Multiple PCIe Cards
Modern PC motherboards often feature more than one x16 PCIe 3.0 lane, meaning that multiple PCIe cards can be installed.
For example, if using four Kinetix cameras and wishing to operate all at the maximum data rate, the imaging setup would involve installing two PCIe cards and running two Kinetix cameras from each card, each using two PCIe cables.
This can be expanded in order to fit as many Kinetix Family cameras as your PC motherboard has room for, but please bear in mind that every model of motherboard, CPU, RAM and memory storage unit are different, and different computers may run into bandwidth limits with operating so many cameras at once.
We recommend testing data limits and consulting your motherboard user manual to determine how much bandwidth is available. As all the components of a PC connect to the motherboard, these components may be using additional processing power and limiting the amount of bandwidth available to run Kinetix cameras. Every use case will be different, so please consider your PC specifications if intending to use many Kinetix cameras from a single PC.
Streaming To Disk with Multiple Kinetix Family Cameras
If intending to stream to disk with multiple Kinetix Family cameras, every component of your PC is called into question, as now there are potential bottlenecks for acquisition, reading, and writing of data.
When streaming to disk the aim is to have an uninterrupted flow of data from the camera directly to the PC memory for as long as required, with no dropped frames and no buffer overflow. This means that the type, speed and size of access memory (RAM) used is important, as well as how much storage space the PC has, whether using SATA/M.2 SSDs or HDDs. If streaming from multiple Kinetix Family cameras, data will rapidly build up and needs to be quickly moved to storage without errors occurring or dropped frames.
As a large amount of storage and fast read/write speeds are both required, we recommend the use of data redundancy, known as redundant array of independent disks or RAID. There are many types of RAID but we make use of RAID 0, which essentially results in very fast read/write speeds and results in 100% drive utilization, but has no data redundancy. In RAID 0 data is split across several drives in parallel, with speed being additive depending on the number of drives. With a large number of drives and a smart RAID controller, very fast read/write speeds can be attained, ideal for streaming to disk with multiple Kinetix Family cameras.
We currently recommend the following m.2 SSD and RAID controller hardware:
- Samsung 970 PRO m.2 model of SSD drive for storage. These range from 250 GB to 2 TB storage each
- The ‘PRO’ series are recommended due to being multi-level cell (MLC) drives, other drives such as the Samsung 970 EVO or the Samsung 980 PRO are triple-level cell (TLC) drives and feature different sustained write performance specifications.
- If only able to use TLC SSDs, precautions must be taken. A minimum of 4x 1 TB drives must be used in RAID 0, data may need to be written in blocks no larger than 1 GB, and 15 minutes between acquisitions may be needed for disks to recover their cache.
- Other configurations of SSD may provide adequate performance but are untested by Teledyne Photometrics,
- HighPoint SSD7101A-1 RAID Controller, which can support up to four m.2 SSDs in RAID 0
- This RAID Controller is a card that connects to the motherboards PCIe lanes and requires a x16 lane, similar to the Kinetix PCIe card.
- Bear in mind some motherboard PCIe lanes are CPU-connected and some use a platform controller hub (PCH), which can have limited speeds by comparison to CPU lanes. As before, please check your motherboard specifications and user manual to ensure performance.
By using four of SSDs in a RAID Controller, these storage devices can be operated in RAID 0 at sufficiently high speeds to read/write data from multiple Kinetix Family cameras. However, this data can be written to RAM, so we also recommend at least 32 GB DDR4 RAM (or more) per Kinetix Family camera in order to optimally stream to disk.
All this is necessary in order to handle data being written at high speeds per camera for potentially long periods of time. If using four Kinetix cameras the data rate is now 20 GB/s, all this must be streamed to disk without any dropped frames. There are many untested configurations of PC, microscope/spectroscope and scientific camera, but a number of our customers are utilizing streaming to disk using four or more Kinetix cameras, resulting in uniquely powerful imaging systems.
Hardware Setup: Prime Family
Other major CMOS cameras from Teledyne Photometrics include the Prime 95B, the Prime BSI and the Prime BSI Express, which make up the Prime Family of cameras. Major specifications of the Prime Family can be seen in Table 6:
Table 6: Comparing specifications of the Prime Family CMOS cameras
|
Camera Model |
QE |
Read Noise |
Pixel Size |
Pixel Array |
Sensor Size |
Speed |
|
Prime 95B |
95% |
1.6 e- |
11 µm |
1200 x 1200 (1.44 MP) |
18.7 mm |
82 fps |
|
Prime 95B 22mm |
95% |
1.6 e- |
11 µm |
1412 x 1412 (2 MP) |
22 mm |
68 fps |
|
Prime 95B 25mm |
95% |
1.6 e- |
11 µm |
1608 x 1608 (2.58 MP) |
25 mm |
60 fps |
|
Prime BSI |
95% |
1.0 e- |
6.5 µm |
2048 x 2048 (4.2 MP) |
18.7 mm |
63 fps |
|
Prime BSI Express |
95% |
1.0 e- |
6.5 µm |
2048 x 2048 (4.2 MP) |
18.7 mm |
95 fps |
With the Kinetix having a maximum data rate of ~5000 MB/s, here are the rates for the Prime Family:
- Prime 95B: 88 MB images at 82 fps = 236 MB/s
- Prime 95B 22mm: 4 MB images at 68 fps = 272 MB/s
- Prime 95B 25mm: 16 MB images at 60 fps = 310 MB/s
- Prime BSI: 4 MB images at 63 fps = 529 MB/s
- Prime BSI Express: 4 MB images at 95 fps = 798 MB/s
As the data rates for the Prime Family are much lower than that of the Kinetix Family, multiple Prime Family cameras can typically be used on an imaging system simultaneously, but there are additional points to consider. Prime Family cameras offer older versions of PCIe (v2.0 compared to Kinetix v3.0) and USB (3.0 compared to Kinetix 3.2 gen2), meaning there are lower data limits.
As with Kinetix Family cameras, please investigate your PC, imaging needs and cable type, and feel free to refer to us at Teledyne Photometrics for our testing limits.
Software Setup
Once your multiple cameras are set up in hardware, the next step is to set up your imaging software of choice. There are many imaging software packages available for use, but these differ in their ability to run multiple cameras simultaneously, or to read/write large data volumes without delay. This section covers the popular open-source program Micro-Manager, but there are caveats to its use, so other software is also discussed.
However, before investigating software setup please ensure you have downloaded and installed the latest PVCAM drivers. PVCAM is our driver that allows cameras to communicate with the PC and acquire images in software. The latest versions of PVCAM can be downloaded from
https://www.photometrics.com/support/software-and-drivers.
Micro-Manager
There are full set-up tutorials on our separate guide ‘How to Use Micro-Manager’ so this section will assume you already have a Hardware Configuration File and know how to use this software for imaging.
Micro-Manager (µM) is capable of running up to 4 PVCAM cameras simultaneously, but it should be noted that µM has an internal data rate limit of ~3 GB/s due to the need to copy image data to a Java backend as it is acquired. So, while µM is capable of running up to 4 PVCAM cameras, there are limits.
The main requirement for simultaneous imaging in µM is that all cameras have the same sensor size or region of interest applied, and the same bit depth of resulting images. This guide is for the specific case where the cameras will be run simultaneously; if you want to install and access multiple cameras without simultaneous use, follow only steps 1, 2 and 6.
How to set up multiple cameras in Micro-Manager
- 1. Creating a new configuration file or editing an existing one, and add in each of the Camera-1, Camera-2 etc. PVCAM camera slots that you are using and name them appropriately.
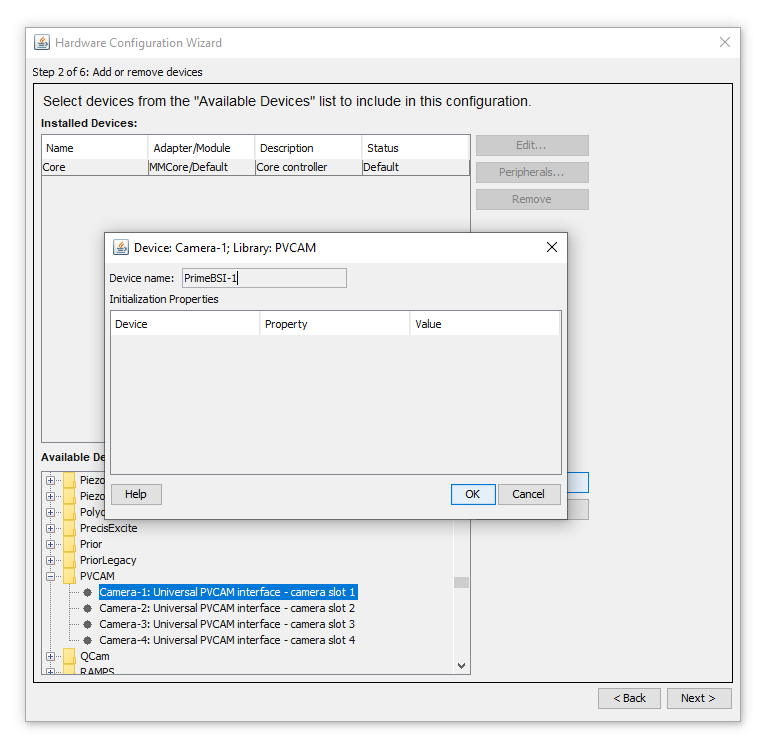
- 2. These should all appear in the Installed Devices list with a status of ‘OK’

- 3. Now we add in a special ‘Multi Camera’ Utility to treat multiple cameras as one multichannel camera device for simultaneous acquisition. Go to the ‘Utilities’ folder and add ‘Multi Camera’.
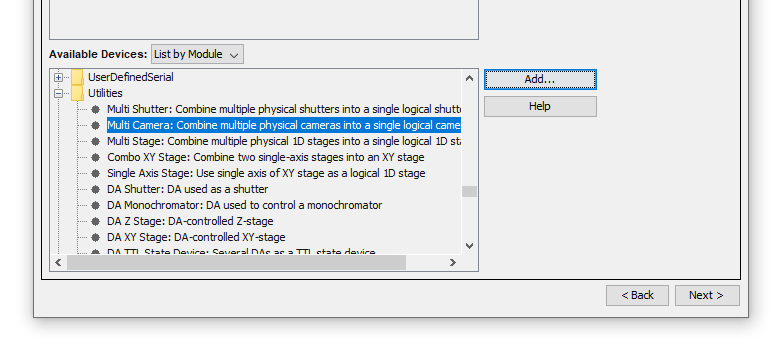
- 4. Now finish off your Hardware Configuration File.
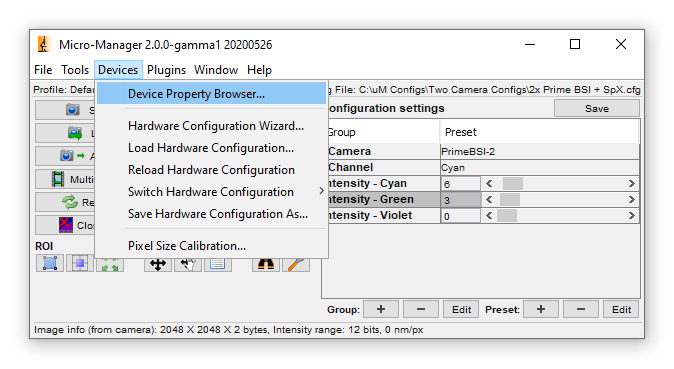
- 5. Once your file is completed and loaded, you may see a ’Circular buffer can’t be started’ error, ignore this, as we need to inform the Multi Camera utility which devices to use. Go to ‘Devices’, open ‘Device Property Browser’ and find ‘Multi Camera-Physical Camera 1’. Choose the appropriate camera for each of these labelled 1 through 4.

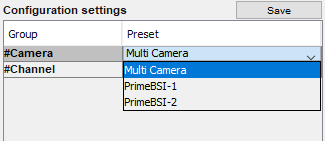
- 6. Now create a Group for Core-Camera

- 7. Select ‘Multi Camera’ in your Camera group to view simultaneous output.
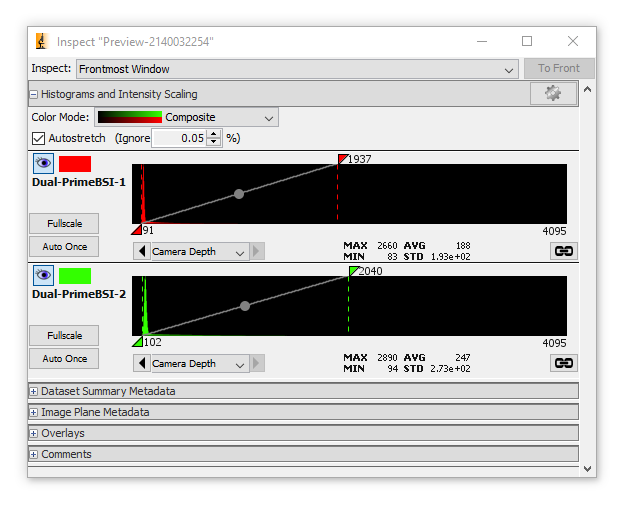
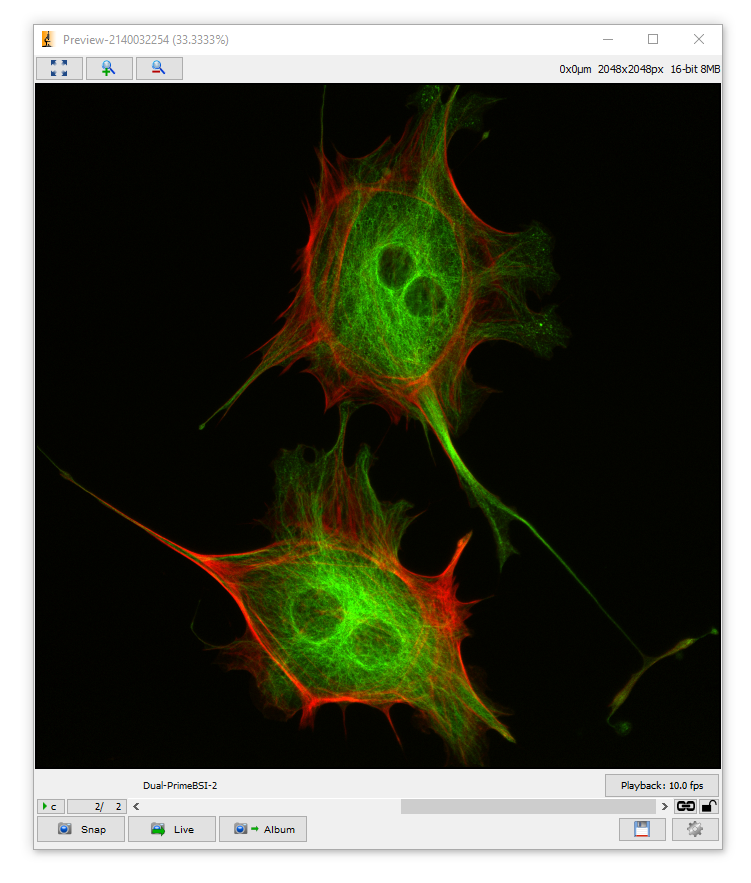
- 8. Hit ‘Live’ to image in multiple colors simultaneously. You may need to set up your image display settings to view a composite image. In the Inspect window under ‘Histograms and Intensity Scaling’, choose ‘Color Mode: Composite’.
- 9. Choose the appropriate color for each channel by clicking the rectangle next to the eye symbol for each histogram, shown below in green and red. The eye symbol will toggle that channel’s visibility.
Other Software Recommendations
As mentioned above, while there are many imaging software packages available for use, they differ in their ability to run multiple cameras simultaneously, or to read/write large data volumes without delay.
For example, while Micro-Manager can run four PVCAM cameras simultaneously, the internal data rate limit of ~3 GB/s creates issues. This limit isn’t sufficient even when running a single Kinetix or Kinetix22 at max data rate, which are 5 and 3.8 GB/s respectively. So if wanting to run multiple Kinetix cameras at max data rate, alternatives are needed.
Beacon
At Teledyne Photometrics we have long used Beacon as an internal testing software, due to its ability to run a single camera at its maximum data rate. We have recently had a public release of our Beacon software, which can be downloaded for free on our website via THIS PAGE, search for 'Beacon'.
Beacon is compatible with our full range of PVCAM cameras, and is designed more for acquisition than analysis, allowing users to configure and control scientific cameras, verify functionality, execute basic imaging experiments, and perform high speed streaming to disk.
However, while Beacon can run our PVCAM cameras at full data rate, it can only control one camera at a time. A solution is to open multiple instances of Beacon, one for every camera. For full details on how to use Beacon and how to perform fast streaming to disk, please see THIS PAGE and search 'Beacon'.
National Instruments LabVIEW
National Instruments’ LabVIEW is a development environment designed specifically to accelerate the productivity of engineers and scientists. With a graphical programming syntax that makes it simple to visualize, create, and code engineering systems, LabVIEW can help you reduce test times, deliver business insights based on collected data, and translate ideas into reality.
The Kinetix, Prime 95B, Prime BSI and Prime BSI Express cameras are currently supported in LabVIEW, and multiple cameras can be run simultaneously at full data rate. For more information, see the LabVIEW section HERE.