Saving Custom Settings on FLIR Machine Vision Cameras
This application note describes how to save custom image settings onto a Teledyne FLIR machine vision camera.
Using Teledyne FLIR machine vision software (whether through a GUI or through working directly with our API), it’s possible to change a variety of settings, such as frame rate, region of interest, pixel format, or gain. The complete list of settings that are stored are found in your camera's Technical Reference manual, available from the downloads page. By default, once a camera has been power-cycled (disconnected from its power source and reconnected), the camera starts up with its factory default settings.
Using the FlyCapture®2 SDK, or the Spinnaker® SDK, it’s possible to save custom settings to the camera so that even after a power-cycle occurs, the camera starts up with the settings that were saved. Each camera is capable of saving up to two custom profiles.
Preparing for use
Before you use your camera, we recommend that you are aware of the following resources available from your product's webpage:
- Getting Started Manual for the camera—provides information on installing components and software needed to run the camera.
- Technical Reference for the camera—provides information on the camera’s specifications, features and operations, as well as imaging and acquisition controls.
- Firmware updates—ensure you are using the most up-to-date firmware for the camera to take advantage of improvements and fixes.
- Tech Insights—Subscribe to our monthly email updates containing information on new knowledge base articles, new firmware and software releases, and Product Change Notices (PCN).
Saving a custom setting
After the cameras have been physically connected, use either the SDK's demo program or write code to save Custom Settings.
Using SpinView
SpinView is the demo program available with the Spinnaker® SDK.
- Open SpinView.
- Select the camera.
- In the Features tab, under the camera model name, make whatever camera settings changes you want to keep (for example, change exposure auto to off).
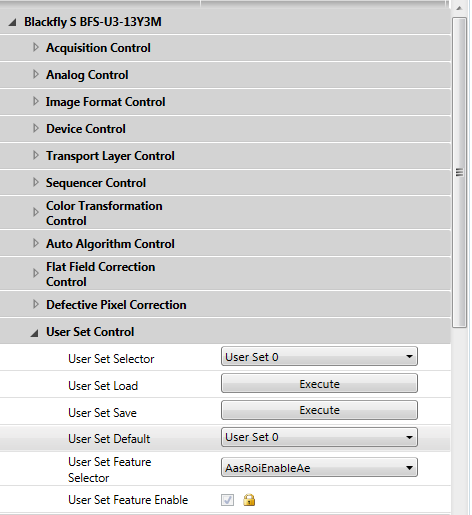
- In the Features tab, under the camera model name, click User Set Control.
- Change User Set Selector to User Set 0 (or User Set 1).
- Click the Execute button beside User Set Save.
- Change User Set Default to User Set 0 (or User Set 1 depending on step 5).

Saving the settings to a user set and changing the default to the same user set ensures the camera starts up with these settings even after a power cycle.
Using FlyCap2
FlyCap2 is the demo program available with the FlyCapture2 SDK.
- Open FlyCap2.
- Select the camera and click Configure Selected.
- Make whatever camera settings you want (for example, in the camera settings tab, uncheck the auto checkbox beside shutter).
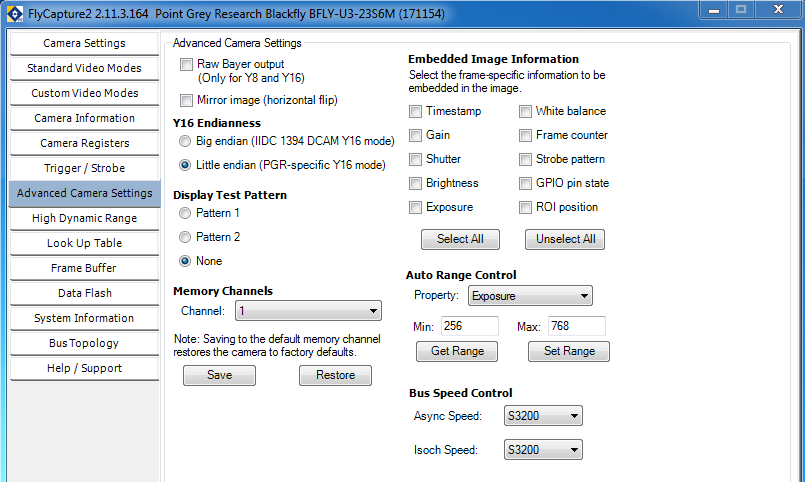
- Select the Advanced Camera Settings tab.
- Change Memory Channel to 1 (or 2).
- Click Save.

There is no User Set Default in FlyCap2. Saving to a memory channel ensures the camera starts up with the settings just saved to this memory channel even after a power cycle.
Restoring to factory default settings
Both Spinnaker and FlyCapture2 have a default profile that can’t be overwritten. This keeps the camera’s factory default settings available.
Using SpinView
- Open SpinView.
- Select the camera.
- In the Features tab, under the camera model name, click User Set Control.
- Change User Set Selector to Default.
- Click the Execute button beside User Set Load.
- Change User Set Default to Default.
Loading the default user set means changing the current camera settings back to factory default settings; changing user set default to Default means after a power-cycle, the camera starts up with default settings.
Using FlyCap2
- Open FlyCap2.
- Select the camera and click Configure Selected.
- Select the Advanced Camera Settings tab.
- Change Memory Channel to default.
- Click Restore.
- Click Save.
Clicking restore means changing the current camera settings to Default settings; clicking save means after a power-cycle, the camera starts up with default settings.
Saving custom settings to multiple cameras
Note; this section only applies to BFS/ORX/FFY cameras, not to any cameras that are compatible with FlyCapture2.
In the situation where you want to share the custom settings you have set on one of your cameras with your other cameras of the same model, you can do so by using SpinView's File Access utility.
- Follow steps 1 through 6 in the "Saving Custom settings" section (Using SpinView section)
- Switch to the File Access tab.
- Change Camera File Access to UserSet0/1, then click on "Download"; choose a title for the custom settings file and save to your hard drive.
- Switch to the second camera in SpinView.
- In the File Access tab, Set Camera File Access to User Set 0/1, then click on the "Upload" button, navigating to the custom settings file you just generated in step 3.
- Switch to the Features tab; under the camera model name, click User Set Control.
- Set User Set Selector to userset 0/1 (whichever one you used for step 5).
- Click the "Execute" button beside User Set Load.
Using the API
It’s possible to make modifications to the custom settings within both the Spinnaker and FlyCapture2 API directly, without needing to go through the SpinView or FlyCap2 applications. Links to sample code showcasing this functionality can be found below.
SavetoUserSet.cpp shows how to save custom settings to a user set. It modifies the exposure time to 2000 microseconds, then saves this change to user set 1. It also shows how to restore to factory default settings.
SavetoMemoryChannel.cpp shows how to save custom settings to a memory channel. It modifies the shutter time to 2 milliseconds, then saves this change to memory channel 1. It also shows how to restore to factory default settings.
Troubleshooting
When in a situation where the camera seems to be in a bad state, it’s possible to resolve this (without power-cycling the camera) by going back to factory default settings. Follow the Restoring to factory default settings section above for details on how to do this.